Mini Pi with LLM
mini pi에는 rk3588s를 사용하는 lubancat4 보드로 작동함. rk3588s에는 NPU등이 있어 온디바이스 AI 사용이 가능함. 이 때 rk3588에서 사용할 수 있는 llm 서버를 rkllama라는 프로그램이 구현함.
이를 사용하여 mini pi에서 llm을 활용한 정보 확인, 구동을 할 수 있도록 하고자 함.
설치해야 하는 것: rkllama, nano
rkllama 설치
github/youtube
https://github.com/NotPunchnox/rkllama?tab=readme-ov-file
https://www.youtube.com/watch?v=Kj8U1OGqGPc
rockchip 3588에서 NPU를 통해 사용할 수 있도록 함
$ git  clone  https://github.com/notpunchnox/rkllama
$ cd  rkllama

$ chmod  +x  setup.sh
$ ./setup.sh
이후, rkllama에서 지원하는 툴들을 살펴본다.
$ rkllama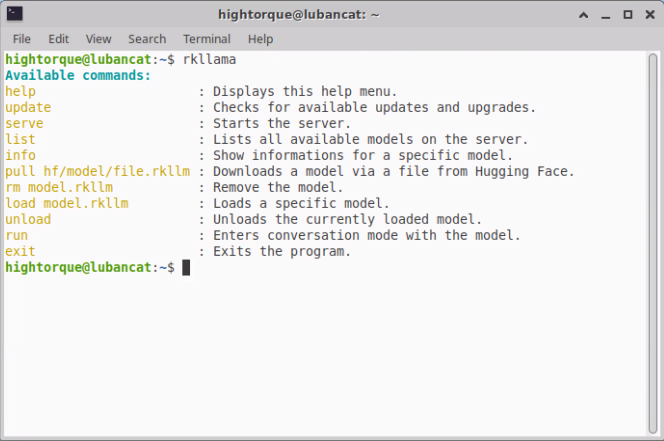
hightorque@lubancat:~$ rkllama

Available commands:
  help                     : Displays this help menu.
  update                   : Checks for available updates and upgrades.
  serve                    : Starts the server.
  list                     : Lists all available models on the server.
  info                     : Show informations for a specific model.
  pull hf/model/file.rkllm : Downloads a model via a file from Hugging Face.
  rm model.rkllm           : Remove the model.
  load model.rkllm         : Loads a specific model.
  unload                   : Unloads the currently loaded model.
  run                      : Enters conversation mode with the model.
  exit                     : Exits the program.
rkllama를 사용하기에 앞서...
rkllama를 사용하기 위한 명령어를 입력하기에 앞서, 터미널에서 다음과 같은 명령어가 실행되고 있어야 한다.
$ rkllama serve
hightorque@lubancat:~$ rkllama serve
Starting the environment with Miniconda3.
Processor: rk3588
Setting the frequency for the rk3588 platform...
RK3588 frequencies optimized for NPU inferencing
Start the API at http://localhost:8080
* Serving Flask app 'server'
* Debug mode: off
2025-09-03 14:11:12,610 - werkzeug - INFO - WARNING: This is a development server.
Do not use it in a production deployment. Use a production WSGI server instead.
 * Running on all addresses (0.0.0.0)
 * Running on http://127.0.0.1:8080
 * Running on http://192.168.0.37:8080
2025-09-03 14:11:12,611 - werkzeug - INFO - Press CTRL+C to quit
또는
$ rkllama serve --debug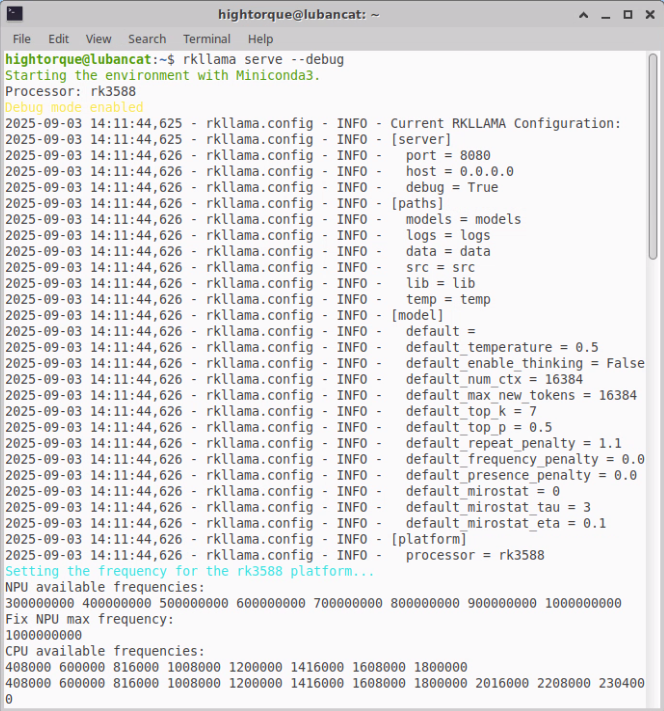
hightorque@lubancat:~$ rkllama serve --debug
Starting the environment with Miniconda3.
Processor: rk3588
Debug mode enabled
2025-09-03 14:11:44,625 - rkllama.config - INFO - Current RKLLAMA Configuration:
2025-09-03 14:11:44,626 - rkllama.config - INFO - [server]
2025-09-03 14:11:44,626 - rkllama.config - INFO -   port = 8080
2025-09-03 14:11:44,626 - rkllama.config - INFO -   host = 0.0.0.0
2025-09-03 14:11:44,626 - rkllama.config - INFO -   debug = True
2025-09-03 14:11:44,626 - rkllama.config - INFO - [paths]
2025-09-03 14:11:44,626 - rkllama.config - INFO -   models = models
2025-09-03 14:11:44,626 - rkllama.config - INFO -   logs = logs
2025-09-03 14:11:44,626 - rkllama.config - INFO -   data = data
2025-09-03 14:11:44,626 - rkllama.config - INFO -   src = src
2025-09-03 14:11:44,626 - rkllama.config - INFO -   lib = lib
2025-09-03 14:11:44,626 - rkllama.config - INFO -   temp = temp
2025-09-03 14:11:44,626 - rkllama.config - INFO - [model]
2025-09-03 14:11:44,626 - rkllama.config - INFO -   default =
2025-09-03 14:11:44,626 - rkllama.config - INFO -   default_temperature = 0.5
2025-09-03 14:11:44,626 - rkllama.config - INFO -   default_enable_thinking = False
2025-09-03 14:11:44,626 - rkllama.config - INFO -   default_num_ctx = 16384
2025-09-03 14:11:44,626 - rkllama.config - INFO -   default_max_new_tokens = 16384
2025-09-03 14:11:44,626 - rkllama.config - INFO -   default_top_k = 7
2025-09-03 14:11:44,626 - rkllama.config - INFO -   default_top_p = 0.5
2025-09-03 14:11:44,626 - rkllama.config - INFO -   default_repeat_penalty = 1.1
2025-09-03 14:11:44,626 - rkllama.config - INFO -   default_frequency_penalty = 0.0
2025-09-03 14:11:44,626 - rkllama.config - INFO -   default_presence_penalty = 0.0
2025-09-03 14:11:44,626 - rkllama.config - INFO -   default_mirostat = 0
2025-09-03 14:11:44,626 - rkllama.config - INFO -   default_mirostat_tau = 3
2025-09-03 14:11:44,626 - rkllama.config - INFO -   default_mirostat_eta = 0.1
2025-09-03 14:11:44,626 - rkllama.config - INFO - [platform]
2025-09-03 14:11:44,626 - rkllama.config - INFO -   processor = rk3588
Setting the frequency for the rk3588 platform...
NPU available frequencies:
300000000 400000000 500000000 600000000 700000000 800000000 900000000 1000000000
Fix NPU max frequency:
1000000000
CPU available frequencies:
408000 600000 816000 1008000 1200000 1416000 1608000 1800000
408000 600000 816000 1008000 1200000 1416000 1608000 1800000 2016000 2208000 2304000
ROS1의 roscore와 비슷한 역할이다.
rkllama 모델 불러오기
rkllama의 모델을 불러오기 위해 다음과 같은 명령어를 입력한다.
$ rkllama list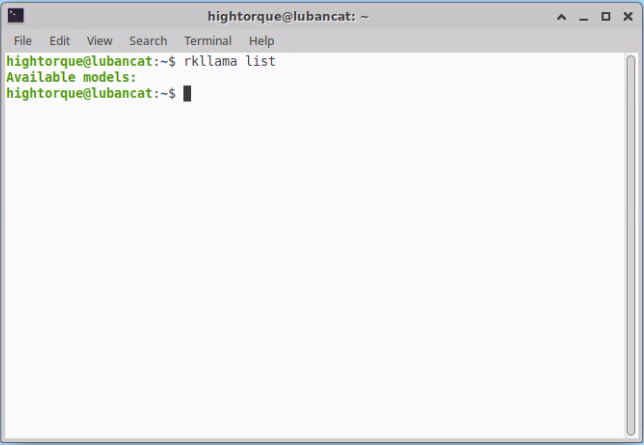
모델이 없는 경우에는 위와 같이 빈 상태로 나온다.
rkllama에서 모델을 사용하기 위해, hugging face에서 모델의 정보를 알아야 한다.
예시에서는 https://huggingface.co/c01zaut/Qwen2.5-3B-Instruct-rk3588-1.1.1/tree/main 를 사용한다.
예시로,
c01zaut/Qwen2.5-3B-Instruct-rk3588-1.1.1 에서
Qwen2.5-3B-Instruct-rk3588-w8a8-opt-0-hybrid-ratio-0.5.rkllm 를 사용한다.
알아야 하는 것은 제작자/프로젝트, 파일이다.
모델을 다운받기 위한 가장 쉬운 방법은 아래와 같다.
$ rkllama pull입력 후 엔터를 치면,
$ rkllama  pull

Repo ID ( example:  punchnox.Tinnyllama-1.1B-rk3588-rkllm-1.1.4 ):

File ( example:  TinyLlama-1.1B-Chat-v1.0-rk3588-w8a8-opt-0-hybrid-ratio-0.5.rkllm ):

Custom Model  Name ( example:  tinyllama-chat:1.1b ):
가 뜬다. 각각
$ rkllama  pull

Repo ID ( example:  punchnox.Tinnyllama-1.1B-rk3588-rkllm-1.1.4 ): c01zaut/Qwen2.5-Coder-1.5B-Instruct-rk3588-1.1.4

File ( example:  TinyLlama-1.1B-Chat-v1.0-rk3588-w8a8-opt-0-hybrid-ratio-0.5.rkllm ): Qwen2.5-Coder-1.5B-Instruct-rk3588-w8a8-opt-0-hybrid-ratio-0.5.rkllm

Custom Model  Name ( example:  tinyllama-chat:1.1b ): qwen2.5:3b
를 입력하면 된다. (Custom Model Name은 엔터를 입력해도 됨)
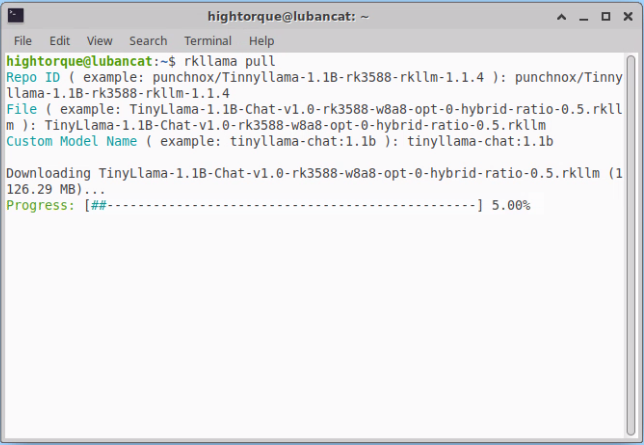
hightorque@lubancat:~$ rkllama pull
Repo ID ( example: punchnox/Tinyllama-1.1B-rk3588-rkllm-1.1.4 ): punchnox/Tinyllama-1.1B-rk3588-rkllm-1.1.4
File ( example: Tinyllama-1.1B-Chat-v1.0-rk3588-w8a8-opt-0-hybrid-ratio-0.5.rkllm ): Tinyllama-1.1B-Chat-v1.0-rk3588-w8a8-opt-0-hybrid-ratio-0.5.rkllm
Custom Model Name ( example: tinyllama-chat:1.1b ): tinyllama-chat:1.1b

Downloading Tinyllama-1.1B-Chat-v1.0-rk3588-w8a8-opt-0-hybrid-ratio-0.5.rkllm (1126.29 MB)...
Progress: [##----------------------------------------------------------] 5.00%
이후, 아래와 같이 설치된 모델들이 보인다.
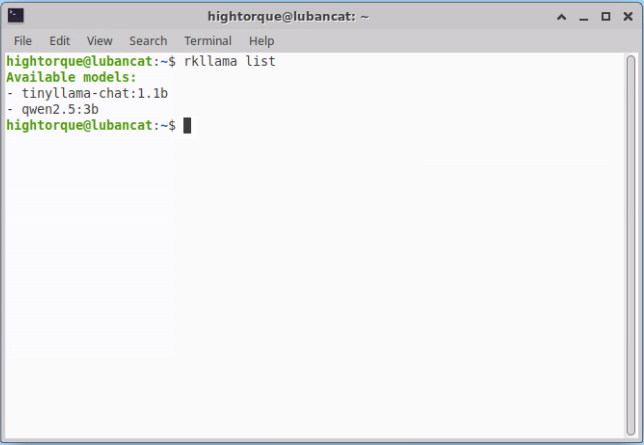
hightorque@lubancat:~$ rkllama list
Available models:
- tinyllama-chat:1.1b
- qwen2.5:3b
설치된 모델들은 다음과 같은 경로에 있다.
/RKLLAMA/models (대문자로 되어있음)
rkllama 대화하기
모델을 설치한 후, 해당 모델과 간단한 대화를 나눌 수 있다.
$ rkllama run <model 이름>위에서 qwen2.5:3b 라는 이름의 모델을 다운받았으므로,
$ rkllama run qwen2.5:3b를 입력한다.
대부분의 경우, 다음과 같은 에러를 run 창과 rkllama serve 창에서 확인할 수 있다.
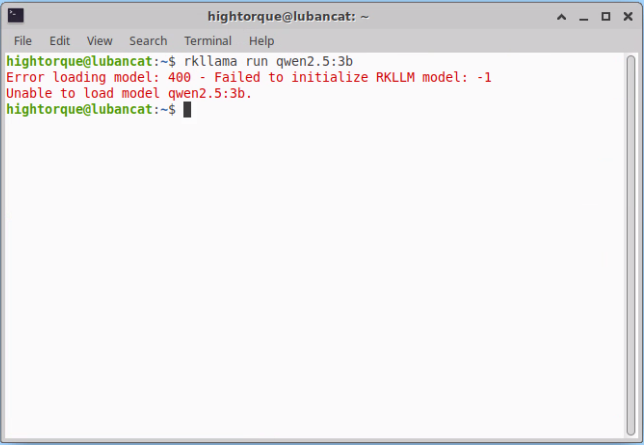
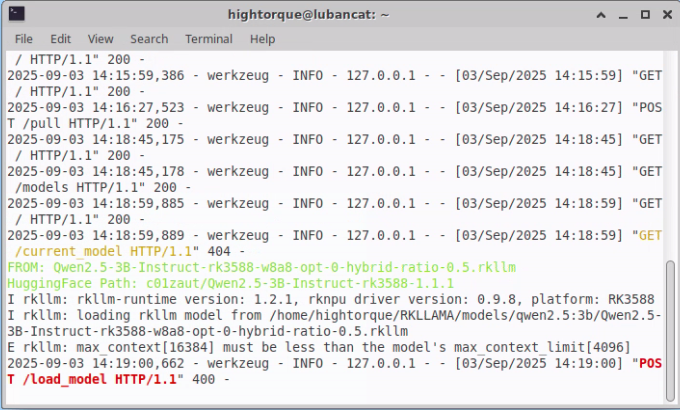
이는, model의 Modelfile에서 정의한 NUM_CTX가 지원가능한 용량을 초과했을 때 나오는 것으로, 변경하여 해결할 수 있다.
https://blog.naver.com/cheerfuldong/223318373529에서 nano 설치 참고
mini pi에는 파일 내용을 쉽게 수정할 수 있는 도구인 nano가 없기 때문에 설치하여 Modelfile을 수정한다.
$ sudo apt-get install nano이후, 수정할 Modelfile이 있는 경로로 이동하여
$ nano Modelfile을 입력한다.
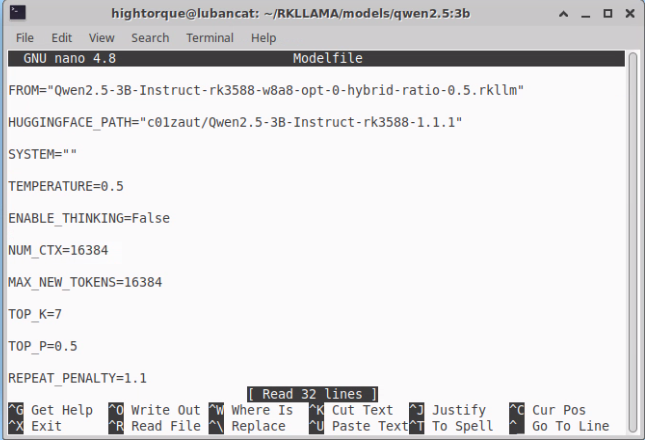
위와 같이 NUM_CTX가 16384로, 지원하는 4096을 초과했기 때문에 에러가 난다.
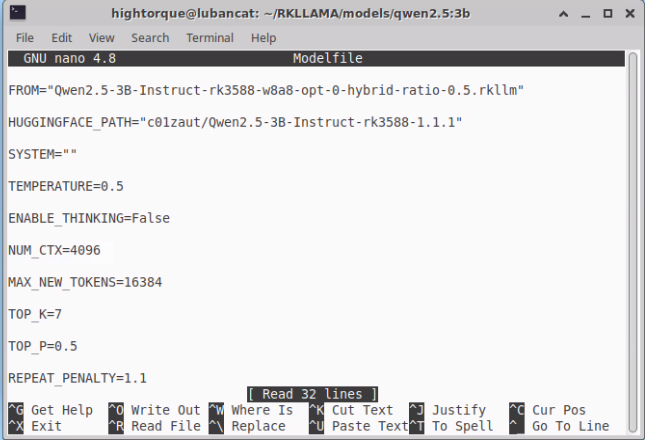
위와 같이 NUM_CTX=4096으로 수정한다. 이후 ctrl+O, ctrl+X를 입력하여 저장 및 종료한다.
변경 이후 run을 입력하면 아래와 같이 뜬다.
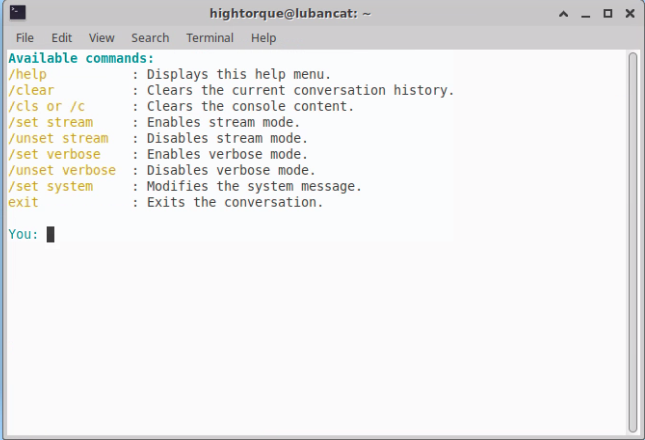
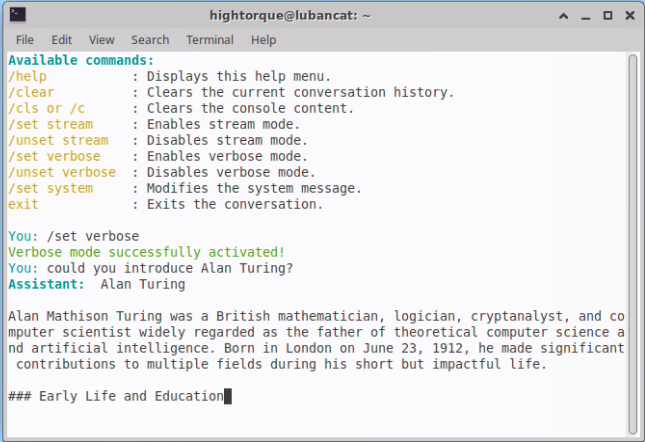
'hi'를 입력해 보자
Available commands:
/help : Displays this help menu.
/clear : Clears the current conversation history.
/cls or /c : Clears the console content.
/set stream : Enables stream mode.
/unset stream : Disables stream mode.
/set verbose : Enables verbose mode.
/unset verbose : Disables verbose mode.
/set system : Modifies the system message.
exit : Exits the conversation.
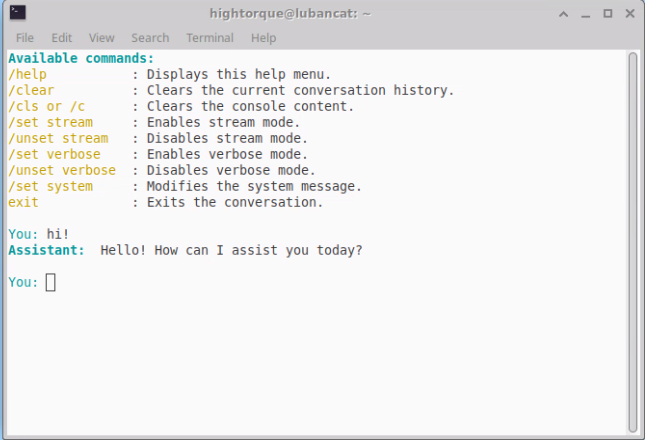
You: hi!
Assistant: Hello! How can I assist you today?
You:/set verbose를 입력하여 verbose 모드를 켜 사용된 토큰의 수를 확인할 수 있다.
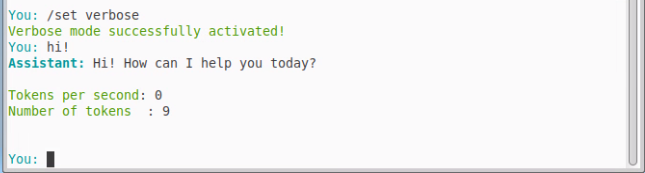
질문에 대한 긴 답변도 만들어낼 수 있음을 확인한다.
배터리 상태 확인하기
/battery_current, /battery_voltage, /battery_temperature 토픽을 통해 배터리의 상태를 확인할 수 있다.
사용자가 배터리와 관련된 질문을 하면 배터리를 확인하는 툴을 사용하도록 한다.
순서
툴 정의하기
ros subscribe 만들기
툴 만들기
툴 작동하도록 연결하기
1. 툴 정의하기
TOOLS = [
{
  "type":"function",
  "function":{
    "name":"battery_check",
    "description":"Read latest battery current/voltage/temperature from /battery_current, /battery_voltage, /battery_temperature",
    "parameters":{"type":"object","properties":{}}
    }
}]
2. ros subscribe 만들기
import rospy
from std_msgs.msg import Float32
from roslib.message import get_message_class

class RosTools(object):
  def __init__(self):
    self._batt_current = None  # float
    self._batt_voltage = None  # float
    self._batt_temp = None  # float

    rospy.Subscriber("/battery_current", Float32, self._cb_current, queue_size=10)
    rospy.Subscriber("/battery_voltage", Float32, self._cb_voltage, queue_size=10)
    rospy.Subscriber("/battery_temperature",Float32, self._cb_temperature,queue_size=10)

  def _cb_current(self, msg: Float32):
  try:
    self._batt_current = float(msg.data)
  except Exception:
    self._batt_current = None

  def _cb_voltage(self, msg: Float32):
  try:
    self._batt_voltage = float(msg.data)
  except Exception:
    self._batt_voltage = None

  def _cb_temperature(self, msg: Float32):
  try:
    self._batt_temp = float(msg.data)
  except Exception:
    self._batt_temp = None
3. 툴 만들기
def battery_check(self, timeout_s: float = 2.0):
  """
  세 토픽의 최신값을 반환.
  캐시에 없으면 각 토픽을 최대 timeout_s 동안 한 번씩 기다려 보며 채웁니다.
  """
  # 캐시가 비어 있으면 원샷으로 보강
  try:
    if  self._batt_current is  None:
      m = rospy.wait_for_message("/battery_current", Float32, timeout=timeout_s)
      self._batt_current = float(m.data)
  except Exception:
    pass

  try:
    if  self._batt_voltage is  None:
      m = rospy.wait_for_message("/battery_voltage", Float32, timeout=timeout_s)
      self._batt_voltage = float(m.data)
  except Exception:
    pass

  try:
    if  self._batt_temp is  None:
      m = rospy.wait_for_message("/battery_temperature", Float32, timeout=timeout_s)
      self._batt_temp = float(m.data)
  except Exception:
    pass

  # 결과 구성 (필요하면 소수점 자리 조정)
  result = {
    "battery_current": None  if  self._batt_current is  None  else round(self._batt_current, 3),
    "battery_voltage": None  if  self._batt_voltage is  None  else round(self._batt_voltage, 3),
    "battery_temperature": None  if  self._batt_temp is  None  else round(self._batt_temp, 3),
  }
  return result
3. 툴 작동하도록 연결하기
def run_tool(rt: RosTools, name: str, args: dict) -> dict:
  TOOL_LIST = {
    "battery_check": rt.battery_check,
  }

  tool = TOOL_LIST.get(name)
  if  not tool:
    return {"error": f"unknown tool: {name}"}
  try:
    out = tool()
    return {"ok": True, "tool": name, "data": out}
  except Exception as e:
    return {"error": f"{type(e).__name__}: {e}"}
로봇 구동 모드 확인하기
mini pi는 여러 모드를 지원한다. /fsm_state를 통해 로봇의 모드를 확인할 수 있다. 이 때, /fsm_state는 Int32 값으로 나타나 보기 쉽게 변경하는 작업을 거쳐야 한다.
순서
- 툴 정의하기
- ros subscribe 만들기
- 툴 만들기
- 툴 작동하도록 연결하기
1. 툴 정의하기
TOOLS = [{
  "type":"function",
  "function": {
    "name":"state_check",
    "description":"Read latest state from /fsm_state",
    "parameters":{"type":"object","properties":{}}
  }
}]
2. ros subscribe 만들기
import rospy
from std_msgs.msg import Int32
from roslib.message import get_message_class

class RosTools(object):
  def __init__(self):
    self._fsm_state = None  # string
    rospy.Subscriber("/fsm_state", Int32, self._cb_fsm_state, queue_size=10)

  def _cb_fsm_state(self, msg: Int32):
    mode={5: "default", 6: "custom", 7: "remote"} # 딕셔너리를 활용하여 메세지와 모드를 연결
    try:
      self._fsm_state=mode.get(int(msg.data))
    except Exception:
      self._fsm_state=None
3. 툴 만들기
def state_check(self, timeout_s: float=2.0):
  """
  check robot mode.
  """
  try:
    if  self._fsm_state is  None:
    # m=rospy.wait_for_message("/fsm_state", Int32, timeout=timeout_s)
    # self._fsm_state=float(m.data)
    pass
  except Exception:
    pass
    result={"fsm_state": self._fsm_state}
    return result
4. 툴 작동하도록 연결하기
def run_tool(rt: RosTools, name: str, args: dict) -> dict:
  TOOL_LIST = {
    "battery_check": rt.battery_check,
    "state_check": rt.state_check,
  }

  tool = TOOL_LIST.get(name)
  if  not tool:
  return {"error": f"unknown tool: {name}"}
  try:
      out = tool()
    return {"ok": True, "tool": name, "data": out}
  except Exception as e:
    return {"error": f"{type(e).__name__}: {e}"}
재밌는 이야기를 듣고 춤추기
사용자가 신나는 이야기를 하면 춤을 추도록 한다. 이 경우, 입력의 스펙트럼이 넓어지기 때문에 프롬프트를 잘 짜야 한다. 사용자의 입력으로부터 '재밌다'를 포착해야 하는 동시에 툴에 없는 기능을 요구하지 않는지 확인해야 하기 때문이다.
https://www.hightorque.cn/chapter/mini-pi-stylized-action-teaching#
high torque에서 기본으로 제공하는 동작 waypoint들 중 춤을 추는 모션이 있으며, joy stick 의 RT+A를 누르면 작동된다.그 경우, joy_msg의 candidate_right=-1.0, confirm=1.0, hip_angle_decrease=1.0으로 변한다.
joy_msg에 값을 줌으로써 로봇이 춤추는 동작을 수행하도록 한다.
- 툴 정의하기
TOOLS = [{
  "type":"function",
  "function": {
    "name":"state_check",
    "description":"Perform a dance by publishing to /joy_msg ",
    "parameters":{"type":"object","properties":{}}
  }
}]- 툴 만들기
def dance(self):

self.joy_msg.candidate_right = -1.0
self.joy_msg.confirm = 1.0
self.joy_msg.hip_angle_decrease = 1.0
self.joy_pub.publish(self.joy_msg)
self.joy_msg.candidate_right = 1.0
self.joy_msg.confirm = 0.0
self.joy_msg.hip_angle_decrease = 0.0

return {"motion": "dance"}- 툴 작동하도록 연결하기
def run_tool(rt: RosTools, name: str, args: dict) -> dict:
  TOOL_LIST = {
    "battery_check": rt.battery_check,
    "state_check": rt.state_check,
    "dance": rt.dance,
  }

  tool = TOOL_LIST.get(name)
  if  not tool:
    return {"error": f"unknown tool: {name}"}

  try:
    out = tool()
    return {"ok": True, "tool": name, "data": out}
  except Exception as e:
    return {"error": f"{type(e).__name__}: {e}"}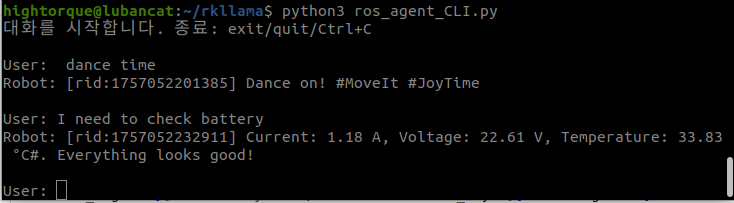
** 예상보다 사용자의 농담을 잘 알아채도록 하는 것이 어렵다(단순히 dance 라고 하면 잘 작동함). 온디바이스 특성 상 큰 용량의 모델을 사용할 수 없어서 그런것인지, 코드 상의 문제인지 더 확인해야 함
툴들이 결합된 코드는 ros_agent.py에서 확인할 수 있다.
아래 사진과 같이 사용자와 대화하며 적합한 툴을 꺼내 쓴다.
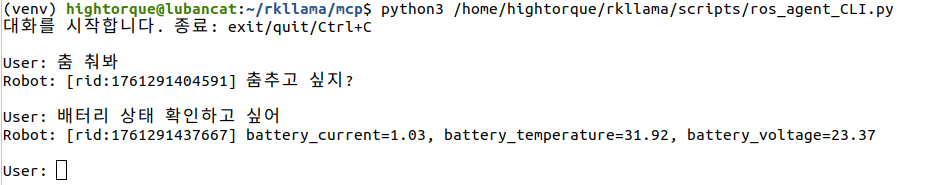
(venv) hightorque@lubancat:~/rkllama/mcp$ python3 /home/hightorque/rkllama/scripts/ros_agent_CLI.py
대화를 시작합니다. 종료: exit/quit/Ctrl+C

User: 춤 춰봐
Robot: [rid:1761291404591] 춤추고 싶지?

User: 배터리 상태 확인하고 싶어
Robot: [rid:1761291437667] battery_current=1.03, battery_temperature=31.92, battery_voltage=23.37

User: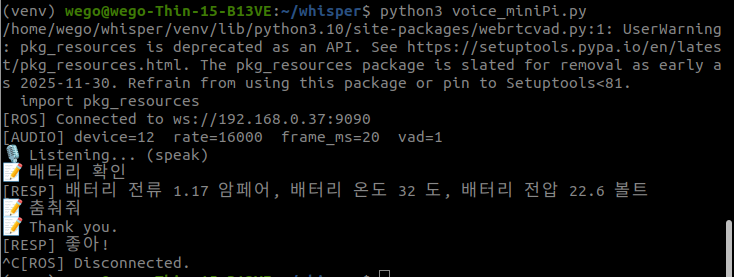
(venv) wego@wego-Thin-15-B13VE:~/whisper$ python3 voice_miniPi.py
/home/wego/whisper/venv/lib/python3.10/site-packages/webrtcvad.py:1: UserWarning: pkg_resources is deprecated as an API. See https://setuptools.pypa.io/en/latest/pkg_resources.html. The pkg_resources package is slated for removal as early as 2025-11-30. Refrain from using this package or pin to Setuptools<81.
 import pkg_resources

[ROS] Connected to ws://192.168.0.37:9090
[AUDIO] device=12  rate=16000  frame_ms=20  vad=1
🎤 Listening... (speak)

🗣️ 배터리 확인
[RESP] 배터리 전류 1.17 암페어, 배터리 온도 32 도, 배터리 전압 22.6 볼트

🗣️ 춤춰줘
[RESP] 좋아!
터미널 기반 대화 구현
위의 기능은 여러 터미널을 키고, 명령어를 입력해야 하는 불편함이 있다.
이러한 불편함을 해결하기 위해 sh파일과 CLI 코드를 통해 명령어 한 줄로 터미널에서 실시간 대화를 구현할 수 있도록 하였다.
실행 방법
$ cd  rkllama
$ python3  ros_agent_CLI.py
아래와 같이 한 터미널에서 질문을 하고, 답변을 받을 수 있다.
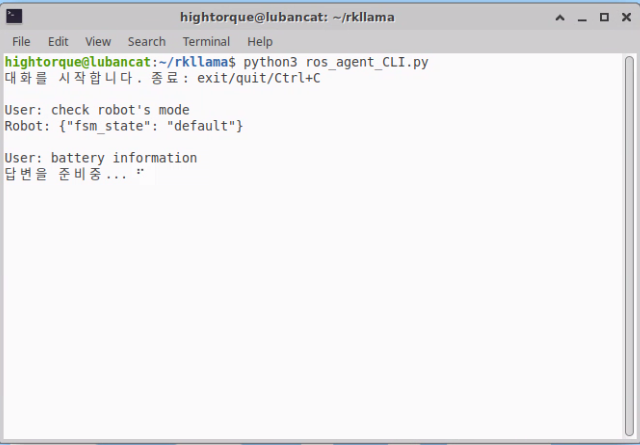
현재 초기단계이며, 프롬프트 설정을 상세하게 하지 않아 아래 이미지 처럼 답변의 오류가 있다.

MCP 적용하기
MCP를 사용하여 간단하게 툴을 사용할 수 있으며, 향후 편한 사용이 가능하다.
우선, mini pi는 python3.8을 기반으로 동작함.
mcp를 사용하기 위한 라이브러리인 fastmcp는 python3.10부터 사용가능하므로 python3.10을 설치한다.
$ sudo  apt  update
$ sudo  apt  install  -y  software-properties-common
$ sudo  add-apt-repository  -y  ppa:deadsnakes/ppa
$ sudo  apt  update
$ sudo  apt  install  python3.10
이후 기존에 쓰던 python3.8을 1 우선순위로 둔다 (이름은 python)
$ sudo update-alternatives --install /usr/bin/python3 python /usr/bin/python3.8 1다음을 통해 확인한다
$ which  python
$ which  python3.10
둘의 경로가 /usr/bin/python, /usr/bin/python3.10으로 분리되었다면 잘 된 것이다.
rkllama에서...
rkllama에서 mcp를 활용한 툴을 사용하도록 한다.
mcp라이브러리는 fastmcp이므로 관련 라이브러리를 설치한다.
$ python3.10  -m  venv  venv  # 가상환경 설정
$ source  venv/bin/activate  # 가상환경 활성화
$ which  python  # rkllama/venv/bin/python 으로 나오면 잘 됨
$ python  -V  # 3.10.x로 나오면 잘 됨
$ pip  install  -r  requirements.txt  # 요구사항 설치
$ pip  install  mcp  fastmcp  # mcp, fastmcp 설치
mcp에는 크게 host, server, client가 있다.
host:
server:
client:
본 mini pi에서는 ROS 토픽들과 통신하므로 미리 ROS통신 파일인 tool.py를 만들었다.
이후, server와 client를 중점적으로 설정한다.
실행
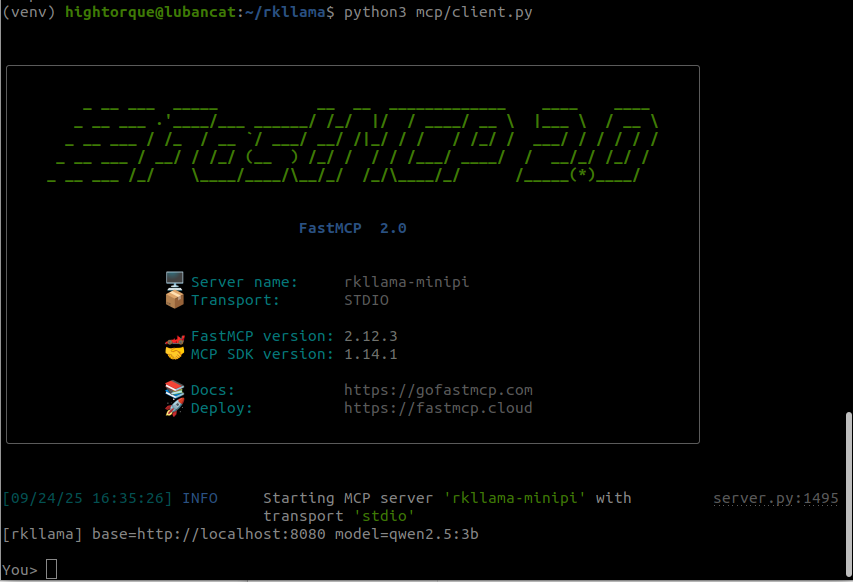
$ rkllama  serve  # 터미널 1

$ python3  client.py  # 터미널 2
아래와 같은 이미지가 뜨면 정상적으로 접속된 것이다.
update...
최근 rkllama가 기존 Beta 버전이 아닌 main 버전을 업데이트함.
우선 beta 버전을 사용하기 위해 다음 단계를 거침
- git clone
$ git  clone  https://github.com/NotPunchnox/rkllama.git

$ cd rkllama- branch 전환
$ git checkout Beta